After installation and first reboot, CrunchBang starts the Post-installation script cb-welcome:

I recommend you run through this process at least once if desired (you can always run it at a later time by typing cb-welcome in a run window), but for brevity we’ll quit the script and run the requisite commands in terminal.
First, lets get CrunchBang updated (open a terminal window and enter the following commands):
sudo apt-get update
sudo apt-get dist-upgrade
To open terminal, right-click on the desktop and select Terminal from the drop-down menu:


Note: Be patient as there may be many updates required to get the OS current
While we wait for the updates to finish, let’s enable automatic login (System –> User Login Settings):

Use the dropdown box to select Default user, put a checkmark in Auto login, and click Save:

Next let’s disable the screensaver (Settings –> Screensaver):

Select Disable Screen Saver under the Mode dropdown:

And lastly, let’s tweak Power Management (Settings –> Power Management):

Note: Turn off all power saving under both Actions and Monitor tabs for AC & Battery (sliders all the way to the left and deselect all checkboxes)
The updates should be complete now, so let’s reboot to make sure they all take effect (right-click and select Exit):

Next we need to install some packages to satisfy dependencies for VirtualBox Guest Additions (remember how to open terminal?):
sudo apt-get install build-essential linux-headers-`uname -r` dkms
Now click Devices and select Insert Guest Additions CD image… from the dropdown:

NOTE: Close the File Manager window that automatically pops up, we’ll install the Guest Additions from terminal
sudo sh /media/cdrom0/VBoxLinuxAdditions.run
Once the Guest Additions are successfully installed, reboot the VM to enable the changes.
Open terminal and add the user to the VirtualBox Shared Folders group (vboxsf):
sudo usermod -a -G vboxsf nodakbarnes
NOTE: Change the username (nodakbarnes) to your username
Power down the VM (use Exit on the Openbox menu and select Power off from the options) so we can setup some shared folders:

In the Oracle VM VirtualBox Manager window click on Shared Folders and then click the little folder to the right of the folders list to add a folder from the host machine to share with the CrunchBang guest:

Start the VM again and when it is fully booted start up File Manager. You can now look under the media folder and there will be a new folder named sf_blahblah (where blahblah is the name of the shared folder from the host):

Let’s get Conky looking a little better (the default isn’t bad but we can do better):

And here’s the code to make this Conky panel (paste into Settings –> Conky –> Edit .conkyrc):
#####################################################################################################################
# Conky Configuration
# Compatible with Gnome2 and OpenBox
# Much of this config file was originally created by corenominal: (http://crunchbanglinux.org/forums/post/220/#p220)
# I've modified it to suit my own needs.
# NodakBarnes | http://nodakengineering.com | wally@nodakengineering.com
#
# Conky Resources:
#  - Documentation: http://conky.sourceforge.net/documentation.html
#  - FAQ: http://conky.sourceforge.net/faq.html
#  - Formatting/Config Settings: http://conky.sourceforge.net/config_settings.html
#  - Variables/Arguments: http://conky.sourceforge.net/variables.html
#  - ManPage: http://conky.sourceforge.net/docs.html
#####################################################################################################################
#

background yes
use_xft yes
xftfont Sans:size=8
xftalpha 1
update_interval 1.0
total_run_times 0
own_window yes
own_window_transparent yes
own_window_type desktop
own_window_hints undecorated,below,sticky,skip_taskbar,skip_pager
double_buffer yes
minimum_size 200 200
maximum_width 200
draw_shades yes
draw_outline no
draw_borders no
draw_graph_borders yes
default_color white
default_shade_color black
default_outline_color white
alignment top_right
gap_x 12
gap_y 35
no_buffers yes
uppercase no
cpu_avg_samples 2
override_utf8_locale no

TEXT
${font sans-serif:bold:size=8}SYSTEM ${hr 2}
${font sans-serif:normal:size=8}$sysname $kernel $alignr $machine
Host:$alignr$nodename
Uptime:$alignr$uptime

${font sans-serif:bold:size=8}PROCESSORS ${hr 2}
${font sans-serif:normal:size=8}${cpugraph cpu1}
CPU: ${cpu cpu1}% ${cpubar cpu1}

${font sans-serif:bold:size=8}MEMORY ${hr 2}
${font sans-serif:normal:size=8}RAM $alignc $mem / $memmax $alignr $memperc%
$membar

${font sans-serif:bold:size=8}BATTERY ${hr 2}
${font sans-serif:normal:size=8}ACPI Battery: $alignr $battery
${battery_bar 11,0}

${font sans-serif:bold:size=8}DISKS ${hr 2}
${font sans-serif:normal:size=8}/ $alignc ${fs_used /} / ${fs_size /} $alignr ${fs_used_perc /}%
${fs_bar /}
SWAP $alignc ${swap} / ${swapmax} $alignr ${swapperc}%
${swapbar}

${font sans-serif:bold:size=8}TOP PROCESSES ${hr 2}
${font sans-serif:normal:size=8}${top_mem name 1}${alignr}${top mem 1} %
${top_mem name 2}${alignr}${top mem 2} %
$font${top_mem name 3}${alignr}${top mem 3} %
$font${top_mem name 4}${alignr}${top mem 4} %
$font${top_mem name 5}${alignr}${top mem 5} %

${font sans-serif:bold:size=8}NETWORK - (wired) ${hr 2}
${font sans-serif:normal:size=8}IP Addr (wired): $alignr ${addr eth0}
${downspeedgraph eth0}
DLS:${downspeed eth0} kb/s $alignr total: ${totaldown eth0}
${upspeedgraph eth0}
ULS:${upspeed eth0} kb/s $alignr total: ${totalup eth0}

${font sans-serif:bold:size=8}SHORTCUT KEYS ${hr 2}
${font sans-serif:normal:size=8}
Alt+F2$alignr Run Dialog
Alt+F3$alignr Alt Menu
Super+Space$alignr Main Menu
Super+Tab$alignr Client Menu
Super+t$alignr Terminal
Super+f$alignr File Manager
Super+e$alignr Editor
Super+m$alignr Media Player
Super+w$alignr Web Browser
Super+l$alignr Lock Screen
Super+v$alignr Volume Control
Super+x$alignr Logout
PrtSc$alignr Screenshot
NOTE: The above will be much simpler if you enable the shared clipboard (Devices –> Shared Clipboard –> Host to Guest) or just open this webpage in your CrunchBang guest VM.
As a final step, put a shortcut on the desktop to the CrunchBang VM so that we don’t need to always open the Oracle VM VirtualBox Manager (right-click on the VM in the VirtualBox Manager and select Create Shortcut on Desktop):
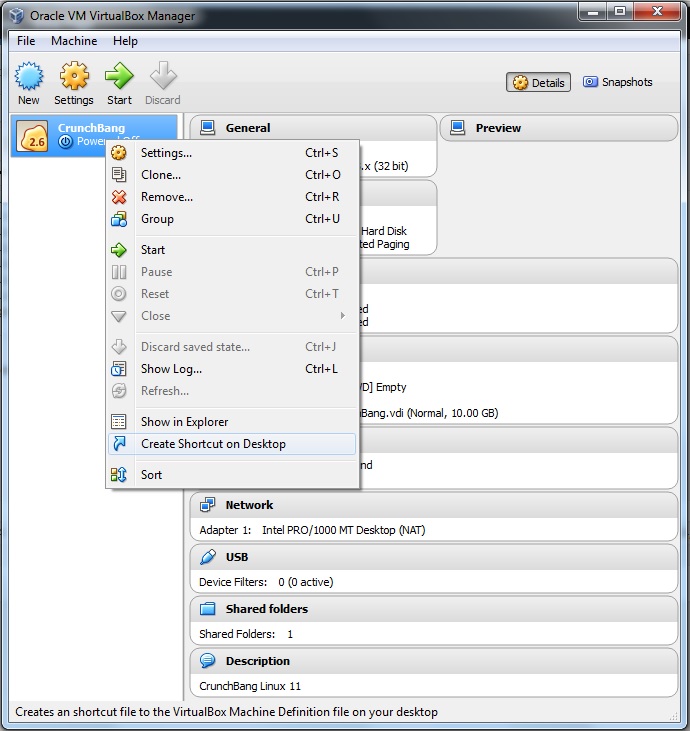
And here’s an icon to make your shortcut look a little nicer (look at image above and select Show in Explorer from right-click drop-down menu for a good place to place the icon–right-click on the CrunchBang desktop shortcut and select Properties and then Change Icon… and browse to this location to select the icon):

That does it then, you’ve got an optimized VM that should run fast and reliably…now go learn Linux!
perfect! thanks :)