Have you ever wanted to learn how to program or just need a clean & efficient environment to do same? I will demonstrate how to set up a very nice development environment to start off with. This tutorial is Windows-centric and will get you set up to program in Linux under an existing Windows installation. To get started lets grab the requisite pieces needed to get going. Here’s what you’ll need:
- Latest version of VirtualBox (download the Extension Pack too)
- CentOS 6.4 (get the i386 DVD1)
If all you want is a quick and dirty of how to do similar the CentOS Wiki has a page describing how to setup CentOS as a Guest OS in VirtualBox.
After installing VirtualBox (I recommend accepting defaults during install) fire it up and then browse to and double-click on the Extension Pack downloaded earlier to install it.
Create a new VM and name it CentOS (notice how “Type” and “Version” are populated with “Linux” and “Red Hat” respectively?) CentOS is a rebuild of Red Hat Enterprise Linux from source and should therefore operate likewise. Why CentOS for our development environment? Well, from the CentOS Wiki:
“This results in a secure, low-maintenance, reliable, predictable and reproducible Linux environment.”
Which is exactly what I want in an environment where I will be developing new softwares.
In the “Create Virtual Machine” wizard I recommend the following minimum settings:
- Memory: 2048 MB
- Hard Drive: 40 GB Dynamically Allocated vdi
Let’s take a look at what we’ve got:

Notice under “Storage” I’ve mounted the CentOS DVD1 ISO that was downloaded earlier (I recommend the 32-bit version as 64-bit is overkill for a VM).
Also notice under “System” the accelerations for the CPU and hardware are enabled (you did enable virtualization in your system BIOS, right?)
Now that our virtual machine hardware is set up, let’s start it up and get the OS installed. Accept the defaults for installation with the exception of the minimum install…instead here select “Software Development Workstation”:

Let that cook for about 20 to 30 minutes and the installation will complete:

Go ahead and reboot, we’ll get into the real meat and potatoes soon.
After the reboot, set up your local user account and uncheck “Enable Kdump” when asked.

After a final reboot you can log into your new CentOS install…take a moment to look at the installed packages (in particular those installed under the “Programming” group) and Emacs under “Accessories”.

And here’s the package groups that get installed with the “Software Development Workstation” load:
Software Development Workstation: base, core, debugging, directory-client, java-platform, network-file-system-client, performance, perl-runtime, server-platform, fonts, print-client, basic-desktop, desktop-debugging, desktop-platform, general-desktop, graphical-admin-tools, input-methods, legacy-x, x11, internet-browser, graphics, emacs, tex, remote-desktop-clients, virtualization, virtualization-client, virtualization-platform, desktop-platform-devel, development, eclipse, server-platform-devel, technical-writing, additional-devel
You can see what each group provides with the following:
yum groupinfo <groupname>
Now that we’ve got the OS installed with our development environment, let’s optimize it for the virtual environment.
First off, let’s get the power settings set so the VM doesn’t try to sleep or hibernate on us (System –> Preferences –> Power Management):


And then let’s shut off the screensaver (System –> Preferences –> Screensaver):

And lastly change the wallpaper to nothing (right-cliick on desktop and select “Change Desktop Background”):

If you’ve matched the settings above the VM should run a bit smoother and not kick in power management unexpectedly (best to leave that task to the host).
Now is a good time to accomplish the task of setting up “sudo” privileges for your user account. To accomplish this, open a terminal and switch to root (use “su -“) and then execute “visudo”:
[nodakbarnes@localhost ~]$ su -
Password:
[root@localhost ~]# visudo
visudo edits the sudoers file in a safe fashion…it’ll open the file in a “vi” session and you’ll need to un-comment the following line (and then save the file — click the vi hyperlink above for a cheat sheet):
%wheel ALL=(ALL) NOPASSWD: ALL
The last step to making you a full-fledged “sudoer” is to add your user to the “wheel” group (System –> Administration –> Users and Groups):

After this simply “logout” or “reboot” to enable the change…welcome to sudoers poweruser! (remember with great power comes great responsibility).
Our CentOS guest VM is still not fully-optimized. One of the major steps to enabling full functionality of a VM is to install the “guest additions”. Before doing this though we should install the “dkms” package so that as the kernel updates are applied to the system, there will be no requirement to re-install the guest additions.
Need the network up in order to use the internet in the VM so click on the little network icon in the top right:

If you want the network to start automatically whenever the VM starts, right-click on the network icon in the top right corner and select “Edit Connections…”:
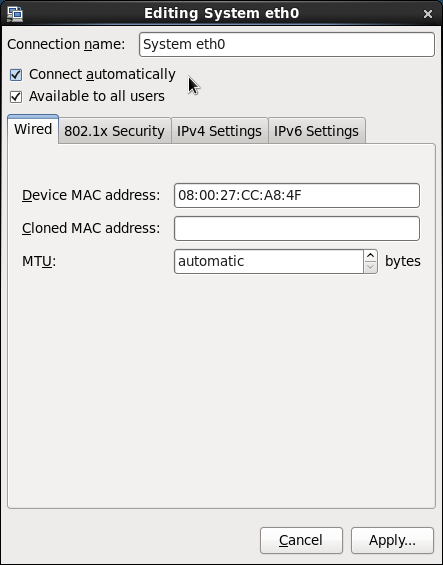
Highlight “System eth0” and then click “Edit…”

Put a checkmark in the “Connect automatically” check box and click “Apply…”
Now, whenever the VM boots, the network will automatically connect.
In order to install “dkms” we need to enable an additional repository…I recommend RPMForge…follow this link to get this repository set up and then install “dkms” (and test your new sudo powers at the same time):
sudo yum install dkms
Now we’re ready to get the guest additions installed (right-Ctrl to release your mouse from the VM and click “Devices” –> “Install Guest Additions”).
The ISO file will auto-mount as a CD and ask to autorun the install script…go ahead and give it permission and the guest additions should install without problems…reboot to see how nice the guest VM runs now (and now you can enable drag-n-drop, a shared clipboard, and shared folders).
NOTE: In order to make shared folders work, you need to add your user to the vboxsf group (after setting up the shared folder, it will appear under “/media/sf_blahblah” where “blahblah” is the name of your share).
If you’re like me and the workstation you’re running your VM on is secure, you can safely enable automatic login to save some time:
sudo gedit /etc/gdm/custom.conf
and add the following under [daemon]:
AutomaticLoginEnable=true
AutomaticLogin=yourusername
NOTE: Be sure to change “yourusername” to your user name.

As a final step before testing our install, lets make sure we’re all up to date:
sudo yum update
After you update and reboot (always recommended after “kernel” updates), let’s go ahead and test our VM to make sure it can compile and execute code (copy the code below into a text file and save it as HelloWorld.java):
/*************************************************************************
 *  Compilation:  javac HelloWorld.java
 *  Execution:    java HelloWorld
 *
 *  Prints "Hello, World". By tradition, this is everyone's first program.
 *
 *  % java HelloWorld
 *  Hello, World
 *************************************************************************/

public class HelloWorld {

    public static void main(String[] args) {
        System.out.println("Hello, World");
    }

}
Open a terminal and go into the directory where you saved your HelloWorld.java program. Execute the commands shown in the sreencap and the program should compile and execute if everything worked:

That’s it…enjoy your new & stable CentOS software development environment!