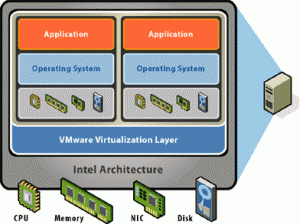
In computing, virtualization (or virtualisation) is the creation of a virtual (rather than actual) version of something, such as a hardware platform, operating system (OS), storage device, or network resources.

Optimizing XP for a Virtual Machine
Create a barebones installation of Windows XP for installation inside a VM. Why, do you ask? Well, as you know a default install of XP can top a couple gigs and the boot is not terribly quick. My optimized XP has a footprint of approximately 300 MB installed and boots in about 15 seconds in VirtualBox on my 2011 MacBook Air…not too shabby.
A quick look at what you’ll need:
- Windows XP (CD or ISO)
- nLite
- Computer running VM (VirtualBox is recommended)
NOTE: My xpLite ISO came in at a slim 82 MB!
Installing Optimized XP in VirtualBox
Last week I demonstrated how to create a custom Microsoft Windows XP setup ISO optimized for installation in a virtual machine environment using nLite. We started with an approximate 500 MB ISO and removed components/services using the nLite utility and pared that down to less than 80 MB. This week I’ll show you how well the unattended install works in VirtualBox and the benefits of doing so.
If you haven’t done so yet, head over to the VirtualBox website and get the binaries needed installed:
https://www.virtualbox.org/wiki/Downloads
CentOS Vagrant Base Box
I will show how to create a headless CentOS minimal installation “box” using Vagrant and VirtualBox. Similar results can be accomplished without Vagrant, but I find that with a little extra work, Vagrant adds enough value to make the effort worth it. According to their website:
Vagrant is a tool for building complete development environments. With an easy-to-use workflow and focus on automation, Vagrant lowers development environment setup time, increases development/production parity, and makes the “works on my machine” excuse a relic of the past.
Here’s what you’ll need (version used in this tutorial):
- Latest version of VirtualBox (4.2.18)
- CentOS Linux operating system–32-bit minimal installation ISO (6.4)
- Vagrant (1.3.3)
- PuTTY (0.62) or Git (1.8.4)
Keep in mind, while I did this in Windows 7, the same can be accomplished in OSX and Linux. So let’s get started and see how it’s done. Click here for the tutorial.
Note: If all you want is the Vagrant box you can download it here.
Optimizing CrunchBang Linux for VirtualBox
CrunchBang is an excellent version of Linux to run in VirtualBox due to the fact that it’s a nimbleOpenbox Linux distribution. That being said, the OS still requires tweaking after install in a VM to get the most performance and satisfaction out of it. I’ve put together a guide to walk one through the installation and optimization settings. So take this opportunity to grab the requisite softwares:
- VirtualBox 4.3.8
- CrunchBang Linux (recommend the 32-bit non-PAE)
And then click here to see how it’s done.
Enable Auto Login in CrunchBang++
Now that a suitable replacement for CrunchBang has come along, you can use my previous guide here for optimizing the lightweight CrunchBang++ Linux operating system as a guest virtual machine. One difference you will find is how to enable auto-login now that the core Debian base has changed in Jessie. The easy method of using a GUI is no longer available, but fret not as the changes required are only minor to enable the auto-login functionality. See below for how it is done:
- Open a terminal window and run the following command to edit the proper config file:
-
$ sudo geany /etc/slim.conf
-
- On line 37 delete the part of the login command after exec and up to the ampersand so the line now looks like this:
-
login_cmd exec /bin/bash -login /etc/X11/Xsession %session
-
- Uncomment line 70 and change simone to your username:
-
default_user nodakbarnes
-
- Uncomment line 78 and change to yes to enable auto-login:
-
auto_login yes
-
That’s it! Now save the file and reboot and enjoy not having to login in every time to your VM.