I will show how to create a headless CentOS minimal installation “box” using Vagrant and VirtualBox. Similar results can be accomplished without Vagrant, but I find that with a little extra work, Vagrant adds enough value to make the effort worth it. According to their website:
Vagrant is a tool for building complete development environments. With an easy-to-use workflow and focus on automation, Vagrant lowers development environment setup time, increases development/production parity, and makes the “works on my machine” excuse a relic of the past.
Here’s what you’ll need (version used in this tutorial):
- Latest version of VirtualBox (4.2.18)
- CentOS Linux operating system–32-bit minimal installation ISO (6.4)
- Vagrant (1.3.3)
- PuTTY (0.62) or Git (1.8.4)
Keep in mind, while I did this in Windows 7, I’ve also done the same in OSX and Linux. So let’s get started and see how it’s done.
Note: If all you want is the Vagrant box you can download it here.
If not already done, install VirtualBox, Vagrant, and PuTTY and/or Git…reboot.
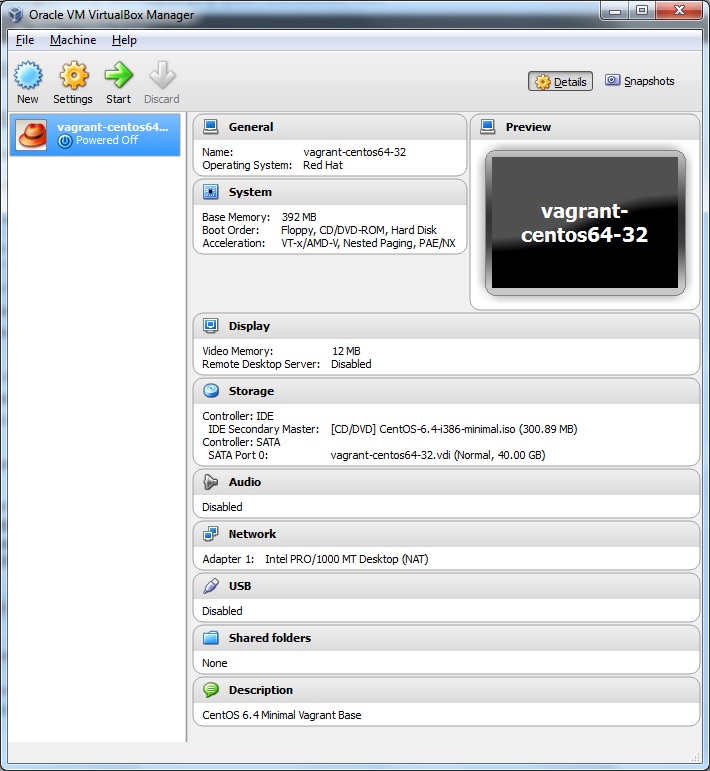
Start up VirtualBox and create a new VM for the CentOS minimal that will be the basis for our Vagrant base box:
- Name the VM “vagrant-centos64-32“
- Set OS Type: Linux
- Set Version: Red Hat
- Memory: 392 MB (Minimum recommended on CentOS Wiki for CLI)
- Hard Drive: 40 GB dynamically allocated vdi
- Disable Audio & USB
- Mount CentOS-6.4-i386-minimal.iso in virtual CD/DVD drive
- Add description “CentOS 6.4 Minimal Vagrant Base“
NOTE: If you leave the memory at 392 MB, the CentOS installer will fail with the error “not enough memory”. As a workaround, bump memory temporarily to 1024 MB so that we get the graphical installer and can get everything setup easily (we’ll change it back to 392 MB after the install).
Start the VM and install CentOS 6.4:
On the name this computer page change the hostname to vagrant-centos64 and click “Configure Network“, highlight “System eth0” and click “Edit…” Place a checkmark in the checkbox next to “Connect automatically“:

Set the root password to vagrant (ignore the warning about it being a weak dictionary password).
After the install completes reboot and login as root.
Issue the following commands to setup and start ssh:
[root@vagrant-centos64 ~]# chkconfig sshd on
[root@vagrant-centos64 ~]# service sshd start
Let’s update and get some stuff installed and reboot (since the kernel was most likely updated too):
[root@vagrant-centos64 ~]# yum update
[root@vagrant-centos64 ~]# yum install nano wget gcc bzip2 make kernel-devel-`uname -r`
[root@vagrant-centos64 ~]# shutdown -r now
And now we’re ready to install the guest additions. Right-click to release the mouse from the guest and click “Devices” on the VirtualBox menu bar and select “Install Guest Additions…” (which mounts the guest additions installation image in the VM):

Then issue the following commands to install the guest additions:
[root@vagrant-centos64 ~]# mkdir /mnt/cdrom
[root@vagrant-centos64 ~]# mount /dev/cdrom /mnt/cdrom
[root@vagrant-centos64 ~]# sh /mnt/cdrom/VBoxLinuxAdditions.run --nox11
[root@vagrant-centos64 ~]# shutdown -r now
NOTE: Do not worry about the “Installing the Window System drivers — FAILED”…this is expected.
After the reboot, the guest additions are installed and running.
Now add the vagrant user (with password vagrant):
[root@vagrant-centos64 ~]# useradd vagrant
[root@vagrant-centos64 ~]# passwd vagrant
NOTE: You can safely ignore the error concerning a simple/dictionary password and simply type it again.
And add vagrant user to the VirtualBox shared folders and admin group:
[root@vagrant-centos64 ~]# usermod -a -G vboxsf vagrant
[root@vagrant-centos64 ~]# usermod -a -G wheel vagrant
Time to setup sudo for vagrant user:
[root@vagrant-centos64 ~]# visudo
And make the following changes:
- Comment out the “Defaults requiretty” line
- Add “Defaults env_keep += “SSH_AUTH_SOCK“
- Uncomment the “%wheel ALL=(ALL) NOPASSWD: ALL” line
Now logout root and login as vagrant and add vagrant user public key:
[vagrant@vagrant-centos64 ~]$ mkdir .ssh
[vagrant@vagrant-centos64 ~]$ curl -k https://raw.github.com/mitchellh/vagrant/master/keys/vagrant.pub > .ssh/authorized_keys
[vagrant@vagrant-centos64 ~]$ chmod 0700 .ssh
[vagrant@vagrant-centos64 ~]$ chmod 0600 .ssh/authorized_keys
We need to setup the software Vagrant relies on. The required software is listed below:
- Ruby – Use the dev package so mkmf is present for Chef to compile
- RubyGems – To install the Chef gem
- Puppet – To install Puppet (also ensure that a ‘puppet’ group is present!)
- Chef gem – For provisioning support (gem install chef)
- SSH – Install PuTTY and/or Git
[vagrant@vagrant-centos64 ~]$ sudo rpm -ivh http://yum.puppetlabs.com/el/6/products/i386/puppetlabs-release-6-7.noarch.rpm
[vagrant@vagrant-centos64 ~]$ sudo yum install ruby rubygems puppet
[vagrant@vagrant-centos64 ~]$ sudo gem install chef
And finally do a little housecleaning and power down the VM:
[vagrant@vagrant-centos64 ~]$ sudo yum clean all
[vagrant@vagrant-centos64 ~]$ sudo poweroff
Now would be a good time to change the memory size of the VM back to 392 MB and remove the guest additions installer iso from the CD/DVD drive.
If we look at the size of the vdi file, it is almost 1.5 GB…let’s start up the VM and run some commands to zero out the sectors so we can make it smaller by compacting it:
[vagrant@vagrant-centos64 ~]$ sudo dd if=/dev/zero of=/bigemptyfile bs=4096k
[vagrant@vagrant-centos64 ~]$ sudo rm -rf /bigemptyfile
[vagrant@vagrant-centos64 ~]$ sudo poweroff
Open a run box and paste in the following to compact the vdi:
"C:\Program Files\Oracle\VirtualBox\VBoxManage.exe" modifyhd "%USERPROFILE%\VirtualBox VMs\vagrant-centos64-32\vagrant-centos64-32.vdi" compact
NOTE: The compacting reduced my VM to less than 1 GB (Vagrant will compact even more during its conversion).
Now it’s time to package the box and add it to your vagrant boxes (recommend opening command prompt in vagrant directory created under windows user profile):
C:\Users\nodakbarnes\Vagrant> vagrant package --output centos64-32.box --base vagrant-centos64-32
C:\Users\nodakbarnes\Vagrant> vagrant box add centos64-32 centos64-32.box
You should now have a centos64-32 base box in your vagrant boxes:
C:\Users\nodakbarnes\Vagrant> vagrant box list
centos64-32 (virtualbox)
NOTE: The resultant “box” is less than 300 MB
Now you can quickly create a Vagrant VM in any directory with:
C:\Users\nodakbarnes\Vagrant> vagrant init centos64-32
C:\Users\nodakbarnes\Vagrant> vagrant up
C:\Users\nodakbarnes\Vagrant> vagrant ssh
NOTE: If the “vagrant ssh” command did not work one of two things may have gone wrong. First did you install Git? If so, then you need to add “C:\Program Files (x86)\Git\bin” to your path and reboot to make it take effect. Alternately you can use PuTTY to connect to the vagrant box (do not use the “vagrant ssh” command in this case).
If you opt for the PuTTY route, the public key from the vagrant installation can be copied to the desktop with the following command in a command prompt:
C:\Windows\system32> copy %USERPROFILE%\.vagrant.d\insecure_private_key %USERPROFILE%\Desktop
Then PuTTYgen can be used to open the file and then save it as a ppk file which can then be used in PuTTY to authorize the connection without needing password.
To use the VM on a new host machine, copy the centos64-32.box file to the new host and from the new host’s shell run the vagrant box add command on it, now you should see the centos64-32 box in vagrant box list on the new host and you can use the box vagrant init command to initialize it.
Download this Vagrant box here.
Thanks for the walkthrough… I needed to get my own centos-base vagrant box built really quickly and this was perfect.. thnx. Cheers dude!
r