Connect LFS Drive and Final Setup
Time to add the LFS hard drive to the host VM (it would be prudent to move the LFS.vdi cloned previously to the same directory as the Slackware.vdi):
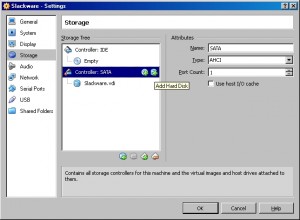
Open up the storage settings and highlight the SATA Controller and click on the little platter icon
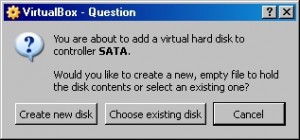
Select Choose existing disk if you cloned the Slackware VDI earlier (otherwise select Create new disk and follow the procedures here to create the LFS drive)
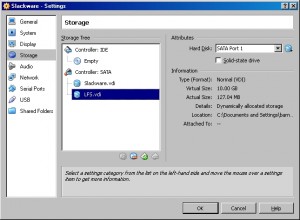
Browse to the location of the LFS.vdi and select it…it is now added to the host VM
Now that we have our Slackware host VM setup and the LFS drive connected, let’s discuss how to SSH into the Slackware host:
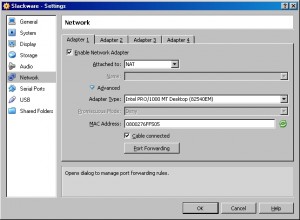
Open the Slackware VM network settings and click the arrow next to Advanced and select Port Forwarding
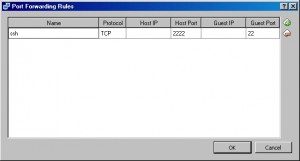
Click the little green icon on the right to add a new rule for SSH (Name: ssh, Protocol: TCP, Host Port: 2222, and Guest Port: 22)…leave the Host & Guest IP fields blank and click OK
Now let’s create a shortcut to start up our VM without the VirtualBox GUI:
"C:\Program Files\Oracle\VirtualBox\VBoxHeadless.exe" -s Slackware
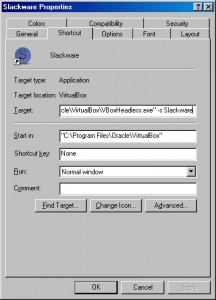
And see below for an icon you can add to this new shortcut to make it look nice:
NOTE: I saved about 50 MB running headless as opposed to using the GUI
Start up the VM using your new shortcut:
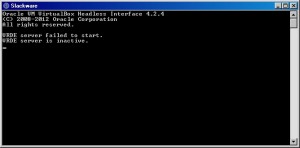
Do not be concerned about the VRDE errors as we will not be connecting via RDP…give the machine a few minutes to start (as the default LILO delay is set to 1200 and can be changed in the /etc/lilo.conf file later)
Now use your favorite terminal program to connect to your Slackware host (I recommend PuTTY):
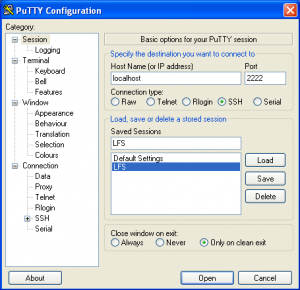
Use the following settings (Host Name: localhost or IP address: 127.0.0.1 and Port: 2222)
After logging in as root for the first time, I recommend checking the Slackware host meets the LFS system requirements by running the version-check.sh bash script called out for in the book…it’s as easy as copying the text from the LFS book and pasting into the PuTTY session (just right-click to paste in PuTTY).
Here’s the output from the run on my setup:
root@nodakengineering:~# bash version-check.sh
bash, version 4.2.37(2)-release
/bin/sh -> /bin/bash
Binutils: (Linux/GNU Binutils) 2.22.52.0.2.20120424
bison (GNU Bison) 2.5.1
/usr/bin/yacc -> /usr/bin/yacc
bzip2,  Version 1.0.6, 6-Sept-2010.
Coreutils:  8.19
diff (GNU diffutils) 3.2
find (GNU findutils) 4.4.2
GNU Awk 3.1.8
/usr/bin/awk -> /bin/gawk-3.1.8
gcc (GCC) 4.7.1
(GNU libc) 2.15
grep (GNU grep) 2.14
gzip 1.5
Linux version 3.2.29-smp (root@hive) (gcc version 4.7.1 (GCC) ) #2 SMP Mon Sep 17 13:16:43 CDT 2012
m4 (GNU M4) 1.4.16
GNU Make 3.82
GNU patch 2.7
Perl version='5.16.1';
GNU sed version 4.2.1
tar (GNU tar) 1.26
Texinfo: makeinfo (GNU texinfo) 4.13
xz (XZ Utils) 5.0.4
gcc compilation OK
Everything looks as it should except for that /usr/bin/yacc should be a link to bison or small script that executes bison…so let’s fix that:
mv /usr/bin/yacc /usr/bin/yacc.orig
ln -sv /usr/bin/bison /usr/bin/yacc
The last command gives the reassuring output:
'/usr/bin/yacc' -> '/usr/bin/bison'
The only other tool you’ll need in your arsenal before you begin is an FTP program (I recommend FileZilla or WS_FTP) for moving files to/from the host VM:
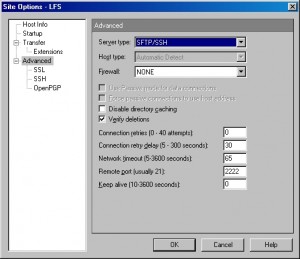
Make sure server type is SFTP/SSH and Remote port is 2222
As a last step, now that we have our LFS drive installed, if you look at the label of /dev/sdb5 it is slack…let’s change that to the more appropriate lfs:
e2label /dev/sdb5 lfs
So now our Slackware Linux host is setup and we should be able to work through the LFS book without issues…now go learn Linux!
Thank you very much for this tutorial! I had been trying to set up LFS on my desktop for a while now, but using VirtualBox on my laptop is much more convenient overall.
Looking forward to tackle such a gratifying project. Thx for ur time and effort.